Garage Tailors

Garage Interior Design & Renovation | Garage Flooring

CALL IAN AT 416.617.7551
FREE IN-HOME CONSULTATION
COMPLETE THE ONLINE GARAGE SURVEYGarage Survey
  • GARAGE STORAGE
    • Bicycle Lifts & Racks
    • Garden Tools
    • Recycling & Garbage
    • Sports Equipment
    • Tire Storage
  • Unique Spaces
    • Shelving, Platforms and Mezzanines
  • Services
    • Wall Organization Systems
    • Garage Cabinets
      • Iconic Cabinets
      • Contur Cabinets
      • Global Steel Cabinets
    • Garage Flooring – Done In a Day
      • Ribtrax Garage Floor Tiles
    • Overhead Storage Racks
      • Strong Racks Overhead Storage
    • Car Lifts
    • Work Stations & Workbenches
  • GARAGE UPGRADES
    • 1 Car Garage Transformations
      • 1 Car Garage – Cabbagetown
      • 1 Car Garage: Slatwall, Cabinets, Overhead Storage – Toronto
      • 1.5 Car Garage – Etobicoke
      • 1 Car Garage – High Park
      • 1 Car Garage – Markham
      • 1 Car Garage – North Toronto
      • 1 Car Garage – North York
    • 2 Car Garage Transformations
      • 2 Car Garage – North Toronto
      • 2 Car Garage – Markham
      • 2 Car Garage – Etobicoke
      • 2 Car Garage – Stouffville
      • 2 Car Garage – Bayview Village
      • 2 Car Garage – Beacon Hall
      • 2 Car Garage – Brampton
      • 2 Car Garage – Etobicoke
      • 2 Car Garage – Lawrence Park
      • 2 Car Garage – North York
      • 2 Car Garage – Oakville
      • 2 Car Garage – Oakville (2)
      • 2 Car Garage – South Oakville
      • 2 Car Garage – Oakville (4)
      • 2 Car Garage – Toronto
      • 2 Car Garage – Willowdale
      • 2 .5 Car Garage – Toronto
    • 3 Car Garage Transformations
      • 3 Car Garage – Aurora
      • 3 Car Garage – Bayview York Mills
      • 3 Car Garage – Newmarket
      • 3 Car Garage – Toronto
      • 3 Car Garage – Etobicoke
      • 3 Car Garage – Richmond Hill
    • 4 Car Garage – Richmond Hill
  • About Us
    • Frequently Asked Questions
    • Customer Testimonials
  • Contact
    • Consultation Request
You are here: Home / Archives for sealant

Garage Flooring, The Rest of the Story

August 27, 2013 by Rick Scully

2 car garage, north york - garage flooring, recycle bins, workbench

With our most recent post, the crucial steps to properly preparing the floor for the application of a new finish was thoroughly discussed. Now that the existing garage floor has been properly prepared, the actual finishing process can begin.  At this point, it is time to get into high gear and ensure best practices are followed to install the best floor finish possible.

Before we begin, here is a quick note about your choices of materials and why professional garage designers Garage Tailors Garage recommends using polyaspartic coatings.  As you probably know, there are two other popularly recommended materials for garage floors: paints and epoxy based coatings.  The challenge with both of these choices is twofold.  For one thing, both paint and epoxy only coat the top most layer of your concrete.  Whether you open the pores or not, paints and epoxy based materials essentially sit on the top of your floor. Alternatively, water soluble materials such as polyaspartic coatings actually penetrate deep down into the concrete pores.  Of course, now you can see yet another reason that opening the pores in the preparation phase is such a crucial step.

A second issue with paints or epoxy materials is that they are not so forgiving when your concrete floor moves.  You see, whether its apparent or not, your garage floor is subject to thermal expansion and contraction. The term thermal expansion and contraction means how your concrete actually swells up and expands in the heat.  In cool weather, the opposite effect occurs; your concrete floor actually shrinks or contracts.  Oftentimes, it is these expansion and contraction cycles that tend to lead to cracking and peeling from painted or epoxy coated floors.  Alternatively, polyaspartic coatings are significantly more forgiving. Polyaspartic coatings tend to move with your floor instead of breaking apart. 

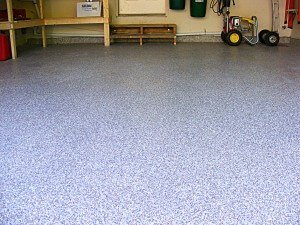
Now it’s time to get back to work. At this point, the professional installation team applies the first application of your new polyaspartic coating.  One thing to note here is that polyaspartic coatings actually dry extremely fast.  Don’t be surprised if you see the installation teams pick up the pace a bit to complete the next steps before the drying process completes.  They know they have to be deliberate and focused as they work to apply the first coating.  Once this first coat is applied, the installation team brings out the color flakes you have chosen.  Remember, you have an incredible array of colors to choose from, we’ll help you with a choice that matches your garage and home exterior.  Just make sure you’ll be happy with your choice for a while.  You will see the installation team applying the color flakes as the base coat is curing. Applying the color flakes at this stage allows the flakes to become firmly and permanently embedded.  At first, it will look like your floor is covered with these color flakes.  That’s okay, though, it’s all part of a professional installation.

Next up, the floor needs to be cleaned up. You will see the installation team fetching their brooms and scrapers. Once the polyaspartic coating with the color flakes has dried, the team works to clean up any loose flakes.  First, you see the team take a broom to sweep up any excess.  Next the team carefully goes over your floor to scrape off any rough edges going both ways, that is up and own.   Now, your floor is vacuumed to remove any remaining flakes or other debris on the floor so that your floor is ready for the remaining steps in this process.

Now you are in the home stretch, where a specialized sealant is applied as the last stage in your floor refinishing project.  This sealant is carefully and methodically rolled onto all sections of your garage floor.  You will be pleased to learn this sealant serves as a final lockdown for your new floor finish. Think of it as a protective shield. At this point in your floor refinishing project, a specialized sealant is applied as a top coating.  This sealant is “rolled” on to your floor and serves as a final lockdown for your new floor finish.  It serves as a protective shield.   The sealant includes an Ultraviolet (UV) ray inhibitor which protects the floor from fading in the bright summer sun.  This sealant is allowed to thoroughly dry.   You will see the installation team conduct a final walk through to make sure the new floor finish is complete and ready for your enjoyment.

 Now that the project is complete here is a little bit more about your new floor finish.  The polyaspartic floor is good for the lifetime of your garage floor.  Unlike some of the other garage floor refinish options that must be redone every 3 to 5 years, you can count on your new polyaspartic floor finish for the lifetime of your garage floor.
Filed Under: Garage Floors Tagged With: best garage floor finish, concrete pores, contraction, drying process, epoxy based coatings, floor refinishing project, garage flooring, north york, Garage Tailors Garage, paints based coatings, polyaspartic coatings, Professional Garage Designers, professional installation team, refinishing project, sealant, specialized sealant, The polyaspartic floor, thermal expansion, Ultraviolet (UV) ray inhibitor

Garage Flooring, The Untold Story

August 13, 2013 by Rick Scully

2 car garage willowdale showcase - painted garage floor, cement block floor

Nowadays many homeowners who want to refinish their garage floors start with online searches or queries with the neighborhood big-box store.  Oftentimes, these inspired homeowners walk out with a do-it-yourself recipe that is sadly lacking a few key ingredients.  Much like leaving out a key ingredient such as yeast when you want to bake a loaf of bread, it’s the missing ingredients that can make or break the success of your garage floor refinishing project.

 The Facts about Proper Garage Floor Refinishing

You have undoubtedly heard the wisdom from the old days about how it’s all about the preparation. That is especially true with your garage floor.  The initial preparation steps are essential to properly finishing your garage floor.

First of all, before any real action starts, the garage floor must be tested for moisture content.  Some of those D-I-Y recipes often fail to mention how important is to determine how much water there is in your concrete floor.  The professional installation team here at Garage Tailors Garage begins each and every floor refinishing project by conducting a moisture test at various sample points around your floor.  You see, without the appropriate strategies to prevent water seeping up into your new floor finish, any existing moisture may well propagate through the concrete and lead to pop ups, peeling or even cracking.  Knowing how much moisture is already there tells the installation team how best to proceed when your new floor coating is applied.

Now that the moisture content has been checked and recorded, the real preparation work begins.  This phase of the project is referred to by the professionals as “opening up the pores”. For now, here’s what you need to know about this process.  You might have seen or heard some recommendations to use muriatic acid to clean or open up the pores in your concrete floor.  This is a lousy idea for a couple of reasons.  As you know, muriatic acid is a hazard.  You do not want to be using this chemical in an enclosed space, or certainly, not without the proper breathing attire, hand and eye protection, that sort of thing.  But more importantly, muriatic acid does not actually perform well on older concrete to clean or open up the pores.  Muriatic acid reacts with existing organics in or on your floor to bind them or lock them into the cement.  Organics are substances such as oils, greases, plant matterand so on. When organic compounds are bound in place, instead of being chemically removed, it does not allow concrete pores from being opened up for a long lasting floor application.

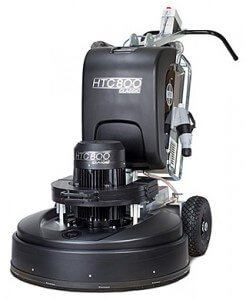
concrete floor preparation grinderProfessional garage floor preparation is best accomplished by an abrasive grinding process which removes the top 1/16 of an inch from the top of your floor.  Understand this grinding process is not even possible without the proper equipment.  The commercial grinder used by professionals is equipped with a large circular carbide blade which removes the uppermost layer of the existing floor.  Additionally, these industrial grinders are equipped with a continuously running vacuum which captures any resulting concrete dust.  You will see the installation team wheel this monster tool into your garage and then carefully grind the entire floor.

The newly exposed concrete is now ready for the next phase of the project.  At this point, the installation team does an exceedingly careful inspection of your garage floor.  They look for and carefully identify and mark any cracks, voids, pitting, etc.  These areas are then carefully repaired one by one with hydraulic cement, a common concrete material found at the big box stores.  This patching material is a fast-curing concrete repair material.  This repair material is allowed to dry, which takes less than an hour.

At this point, your preparation steps are just about complete. The installation team carefully sweeps up any loose material, smoothes out any rough repair material and ensures the entire surface is ready for the next step.  After removing all the loose material, the team  works on the  moisture barrier.  In this case, the moisture barrier is a solution that is carefully and methodically applied to the entire surface of your floor.  This highly specialized sealant material penetrates through the freshly opened pores of the concrete to bind the sealant and create that essential water barrier that prevents floor coatings from lifting.  Once it is dry, this sealant protects your floor and your new floor covering from moisture intrusion.

Does all of the above sound like a lot?  Well, for a homeowner or a weekend D-I-Y ‘er, it might be, but for the professional installation team here at Garage Tailors Garage, it’s all in a day’s work.

Next: Once the floor is prepared, how is the new floor coating applied? 

Filed Under: Garage Floors Tagged With: abrasive grinding process, breathing attire, circular carbide blade, commercial grinder, concrete floor, D-I-Y recipes, floor coatings, floor covering, floor refinishing, floor test, garage flooring, hand -eye protection, moisture barrier, moisture content, moisture intrusion, muriatic acid, Garage Tailors Garage, organic compounds, professional installation team, sealant, water barrier

  • GARAGE STORAGE AREAS
    • Automotive Accessories
    • Bicycle Storage & Bike Racks
    • Garden Tools & Supplies Storage
    • Household Supplies
    • Recycling and Garbage Bin Storage
    • Sports Equipment
    • Tire Storage
  • Storage Solutions: Made to Measure Solutions
    • Shelving, Platforms and Mezzanines
  • Products
    • Exotic Car Enthusiasts
    • Garage Wall Organization Systems
    • Garage Cabinets
      • CTech Cabinets
      • Contur Cabinets
    • Garage Flooring – Done In a Day
    • Storage Systems
    • Overhead Garage Storage & Platforms
    • Work Stations & Workbenches
  • GARAGE UPGRADES
  • Customer Testimonials
  • Consultation Request
  • Frequently Asked Questions
  • About Us
  • Contact

GARAGE VIEWS FROM NUVO

  • Get Ready to Drool – Epoxy Garage Floors Are the Ultimate Luxury Upgrade!
  • Is It Worth Investing In Epoxy Garage Flooring?
  • A Guide To Help You Get Rid Of Unwanted Mess In The Garage
  • Things To Keep In Mind While Organizing Your Garage
  • A Guide To Help You Convert Garage Into A Practical Space
  • 5 Key Reasons Your Garage Door Needs An Instant Repair
  • Did You Select The Right Door For Your Garage?
  • Do I Really Need A Garage Cabinet System?
  • Make Best Use Of Your Space With These Amazing Garage Storage Ideas
  • 5 Top Reasons To Keep Your Garage Properly Structured
  • A Detailed Guide To Help Keep The Garage Properly Organized
  • Five Reasons to Install an Epoxy Garage Floor Coating

Garage Tailors INC.
51-3176 Ridgeway Drive
Mississauga, Ontario
L5L 5S6

416.617.7551
Twitter LinkedIn Google Plus Pinterest Facebook RSS Feed
Copyright © 2023 · Garage Tailors Garage Inc.
Website Design by Yenius Interactive Marketing