With our most recent post, the crucial steps to properly preparing the floor for the application of a new finish was thoroughly discussed. Now that the existing garage floor has been properly prepared, the actual finishing process can begin. At this point, it is time to get into high gear and ensure best practices are followed to install the best floor finish possible.
Before we begin, here is a quick note about your choices of materials and why professional garage designers Garage Tailors Garage recommends using polyaspartic coatings. As you probably know, there are two other popularly recommended materials for garage floors: paints and epoxy based coatings. The challenge with both of these choices is twofold. For one thing, both paint and epoxy only coat the top most layer of your concrete. Whether you open the pores or not, paints and epoxy based materials essentially sit on the top of your floor. Alternatively, water soluble materials such as polyaspartic coatings actually penetrate deep down into the concrete pores. Of course, now you can see yet another reason that opening the pores in the preparation phase is such a crucial step.
A second issue with paints or epoxy materials is that they are not so forgiving when your concrete floor moves. You see, whether its apparent or not, your garage floor is subject to thermal expansion and contraction. The term thermal expansion and contraction means how your concrete actually swells up and expands in the heat. In cool weather, the opposite effect occurs; your concrete floor actually shrinks or contracts. Oftentimes, it is these expansion and contraction cycles that tend to lead to cracking and peeling from painted or epoxy coated floors. Alternatively, polyaspartic coatings are significantly more forgiving. Polyaspartic coatings tend to move with your floor instead of breaking apart.
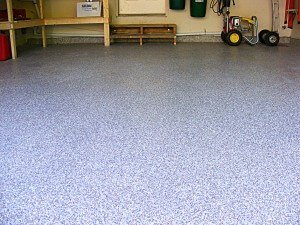
Now it’s time to get back to work. At this point, the professional installation team applies the first application of your new polyaspartic coating. One thing to note here is that polyaspartic coatings actually dry extremely fast. Don’t be surprised if you see the installation teams pick up the pace a bit to complete the next steps before the drying process completes. They know they have to be deliberate and focused as they work to apply the first coating. Once this first coat is applied, the installation team brings out the color flakes you have chosen. Remember, you have an incredible array of colors to choose from, we’ll help you with a choice that matches your garage and home exterior. Just make sure you’ll be happy with your choice for a while. You will see the installation team applying the color flakes as the base coat is curing. Applying the color flakes at this stage allows the flakes to become firmly and permanently embedded. At first, it will look like your floor is covered with these color flakes. That’s okay, though, it’s all part of a professional installation.
Next up, the floor needs to be cleaned up. You will see the installation team fetching their brooms and scrapers. Once the polyaspartic coating with the color flakes has dried, the team works to clean up any loose flakes. First, you see the team take a broom to sweep up any excess. Next the team carefully goes over your floor to scrape off any rough edges going both ways, that is up and own. Now, your floor is vacuumed to remove any remaining flakes or other debris on the floor so that your floor is ready for the remaining steps in this process.
Now you are in the home stretch, where a specialized sealant is applied as the last stage in your floor refinishing project. This sealant is carefully and methodically rolled onto all sections of your garage floor. You will be pleased to learn this sealant serves as a final lockdown for your new floor finish. Think of it as a protective shield. At this point in your floor refinishing project, a specialized sealant is applied as a top coating. This sealant is “rolled” on to your floor and serves as a final lockdown for your new floor finish. It serves as a protective shield. The sealant includes an Ultraviolet (UV) ray inhibitor which protects the floor from fading in the bright summer sun. This sealant is allowed to thoroughly dry. You will see the installation team conduct a final walk through to make sure the new floor finish is complete and ready for your enjoyment.
Now that the project is complete here is a little bit more about your new floor finish. The polyaspartic floor is good for the lifetime of your garage floor. Unlike some of the other garage floor refinish options that must be redone every 3 to 5 years, you can count on your new polyaspartic floor finish for the lifetime of your garage floor.


